

Plywood Die Board Laser Cutting Machine Solutions for Precision Die Production
2026-11-16
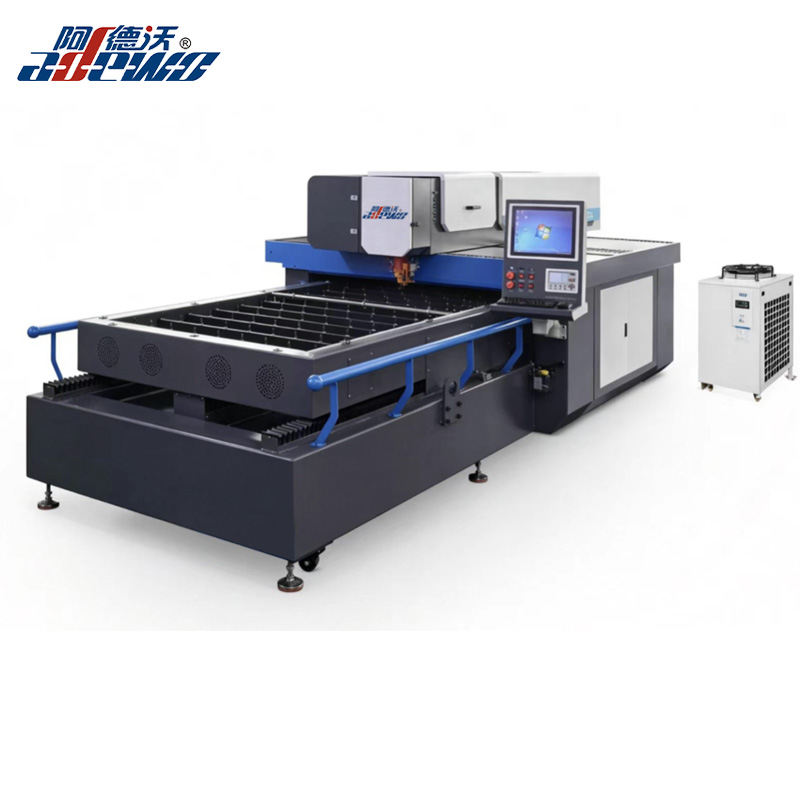
When precision die production depends on clean, repeatable cuts, a plywood die board laser cutting machine changes the whole workflow. Instead of fighting material drift, rough edges, or slow turnaround, shops can move from CAD file to finished die board with far less handling. At ADEWO, that shift is built around laser systems designed for the demands of modern die making—where kerf control, edge quality, and uptime are not afterthoughts. This post looks at what actually matters when choosing laser cutting equipment for plywood die boards, and how the right machine can remove bottlenecks you may have learned to live with.
Where Plywood Grain Direction Meets the Laser Path
Plywood never behaves like a single sheet of material. The laser might glide along a face veneer with open, straight grain for a few centimeters, then hit the underlying crossband where fibers run at ninety degrees. At that junction the cut speed feels wrong even when the settings haven't changed; the beam lingers in soft earlywood, tears through denser latewood, and leaves an edge that shifts from pale amber to dark brown in the space of a single pass.
That shift is most obvious when the path crosses a glue line or a rotary-cut patch. Instead of fighting the change with more power, it usually works better to lower the focus a fraction and let the beam ride the denser layer with a slower, steadier feed. The result is a kerf that follows the plywood's own rhythm rather than imposing a uniform setting on every direction.
After a few test cuts the grain direction starts to read like a map. You can plan the laser path so the beam moves with the face grain on visible edges, then let the crosscut side show a slightly darker, almost textured finish. That variation is not a defect; it is the point where the tool and the material actually meet.
The Limits of Jigsaw Accuracy in Die Board Work
Even a well-maintained jigsaw brings a certain looseness to die board cutting that other methods do not. The blade deflects under feed pressure, narrow curves invite wander, and the resulting slot width can shift by a few thousandths of an inch without ever looking wrong to the eye. When those slots are meant to hold rule at a consistent height and angle, small deviations accumulate quickly across a full sheet.
Material choice compounds the problem. Baltic birch plywood, still common in die board construction, has density changes between layers and occasional voids that grab the blade just enough to alter the path. Operators often compensate by steering harder or slowing the feed, but this introduces another variable: hand pressure. Two cutters working from the same pattern can produce noticeably different fits, not because of carelessness, but because jigsaw work is inherently interpretive at the tool edge.
The practical limit usually shows up at assembly rather than at the saw. If a bridge between slots becomes too thin, it snaps when rule is pressed in. If a slot is slightly wide, the rule leans and cutting depth suffers. Tight tolerances are possible with jigsaws, but they depend on sharp blades, stable material, and an operator who understands that the target is not simply following a line—it is producing a slot that grips steel evenly across its length.
Why Thicker Plywood Demands a Different Cutting Strategy
Thicker plywood pushes back in ways that thinner panels rarely do. The blade has to clear more material along every inch of the cut, so heat builds faster and a tooth geometry that sails through 12 mm stock can start burning 18 mm or 25 mm panels. Slowing the feed rate sounds obvious, but it only helps if the blade is clean and matched to the cut; otherwise friction turns into scorch marks and hardened resin along the edge.
Tear-out also becomes harder to control as the bottom veneer gets farther from the blade entry point. A deep cut drags fibers downward and can blow out large chips before the teeth exit the sheet. A scoring pass, a zero-clearance insert, or a strip of masking tape along the cut line prevents much of that damage. On thicker stock, a blade with more teeth and a negative hook angle tends to leave a cleaner shoulder than an aggressive framing blade.
Panel weight and sag add another layer of trouble. A heavy sheet that dips in the middle can close the kerf behind the blade, overheat the plate, and raise the risk of kickback. Supporting the panel close to the cut line matters as much as blade selection. Some shops switch to a track saw or add an outfeed table just to keep the offcut from breaking away and splintering the edge during the final inches of the pass.
Edge Finish as the Difference Between Clean Creases and Board Dust
A fold is only as clean as the edge it starts from. When the blade cuts through board stock without dragging fibers, the crease forms along a defined line and the surface stays free of loose particles. That sharpness is what lets a panel snap into position instead of rocking on a ragged shoulder.
Dull tooling changes the result before the job reaches the folder. Instead of slicing the stock, it frays the top layer and leaves a fine dust that settles into every groove. Those particles work their way under the sheet, marking the print and giving the finished piece a worn look even when it is brand new.
Few people can explain why one sample feels premium while another feels disposable. The difference often sits in the edge. A clean edge produces a crease that holds without cracking; a dusty edge spreads debris across the run and turns a simple fold into a maintenance problem downstream.
From CAD Outline to Usable Die Board Without Manual Cleanup
Most CAD outlines for packaging and gasket work arrive with problems that are invisible until the laser starts moving: duplicated lines stacked on top of each other, tiny gaps at corners, stray nodes, and splines that break toolpath generation. The usual route is to spend hours cleaning the file by hand, deleting overlaps and rejoining open contours. In this workflow, the original outline is processed directly into a closed, ordered cut path before it reaches the die board layout, so the operator never has to zoom in and fix broken geometry one segment at a time.
The conversion pass handles common defects as part of a single sequence. Nearby endpoints are snapped within a small tolerance, duplicate and co-linear segments are collapsed, and unclosed profiles are closed only where the gap is below a defined threshold, which prevents accidental bridges across intentional slots. Splines and polylines are flattened into arc-and-line segments with an adjustable tolerance, and offset compensation is applied once for the laser kerf instead of relying on the operator to trick the artwork manually.
What reaches the production file is a die board ready for toolpathing, with stable geometry that does not shift when tool compensation is turned on. Bridges and tabs are inserted after the cleanup stage, so they land on real cutting paths rather than on duplicate or self-intersecting lines. Because the result no longer depends on a technician spotting every flaw, a revised outline can be reimported later and turned into an updated board in a fraction of the time.
Laser Power Settings That Protect the Kerf in Hardwood Plywood
Hardwood plywood doesn’t forgive a heavy-handed beam. The layered adhesive and dense face veneer heat unevenly, so running at full power often leaves a kerf that’s blackened, brittle, or slightly collapsed. A better starting point on many 40–60W CO₂ lasers is roughly 55–70% power with air assist on, then fine-tune from there.
Lower power with multiple passes usually beats one hard pass. Between passes the glue line has a moment to cool, and the top veneer doesn’t scorch as deeply. Keep the speed moderate rather than slow-crawling; moving too slowly can pump more heat into the same spot than a slightly faster second pass.
Let the cut edge tell you what’s wrong. A protected kerf shows tan to light-brown fibers and a crisp corner, not shiny black resin. If the edge looks glazed or the bottom side has blowout, back the power down in 5% steps and cut a small coupon to check the result before committing to the full sheet.
FAQ
Laser cutting produces narrow kerfs and smooth edges, which helps maintain tight tolerances on slot and blade positions in plywood die boards. The heat-affected zone is small, so the wood does not char excessively or lose dimensional stability.
CO2 lasers are commonly used because plywood absorbs the 10.6 µm wavelength efficiently. A higher wattage tube, typically 150W to 300W depending on thickness, gives clean cuts without forcing the material and reduces edge burning.
The cutting parameters can be adjusted for material thickness, density, and glue content. A well-tuned system changes speed, power, and air assist pressure per job, so the same machine can process thin veneer-core boards and thicker high-density plywood without changing optics.
Air assist blows away smoke, resin, and debris from the cut path. It also cools the cut edge and reduces flare-ups, which prevents dark residue and keeps the slot dimensions accurate for later blade insertion.
Yes. The design is imported from CAD or die layout software, and the laser follows the vector paths for the outer contour, interior slots, and bridge holes. Since the process is non-contact, narrow gaps and sharp corners can be produced without tool wear.
Regular cleaning of the lens and mirrors, checking beam alignment, emptying the exhaust filtration system, and keeping the honeycomb or slat bed free of resin buildup are key. The motion system should be lubricated according to the manufacturer's schedule to maintain repeatability.
Laser cutting is usually faster for complex slot patterns and produces a narrower kerf than a router bit. There is no bit breakage or dulling, and the edge finish is generally smoother. However, the exhaust and beam safety systems require more attention than a standard CNC router setup.
A fully enclosed cabinet with interlocked doors, proper laser safety glass, fume extraction with activated carbon or HEPA filtration, and emergency stop controls are essential. Operators should also be trained on fire prevention because plywood and resin can ignite if settings are incorrect.
Conclusion
A laser that follows the plywood’s grain without fighting it changes how die boards are produced. Traditional jigsaw methods start to lose accuracy the moment the blade wanders, and that drift becomes more obvious on tight curves and narrow slots. With a plywood die board laser cutting machine, the beam meets the surface at a controlled angle and moves along CAD paths instead of forcing a reciprocating blade through layered veneers. Thicker sheets make the contrast clearer: a saw tends to deflect under load, while a laser can adjust focal position, air pressure, and pulse frequency to keep the cut consistent from top to bottom. Matching the cutting route to the grain direction also reduces tear-out in softer earlywood zones, which means fewer rejected boards before the rule insertion stage. This approach removes the guesswork that normally surrounds dense hardwood plywood and leaves a die board that matches the original layout rather than an approximation of it.
Clean edges determine whether a die board produces sharp creases or sheds dust into the cutting press. Laser cutting seals and darkens the kerf just enough to prevent the fuzzy fibers that often remain after mechanical routing, so slots hold steel rule more firmly and stripping becomes less dependent on manual sanding. The workflow from CAD outline to usable board is shortened because the same file that defines the geometry also drives the cutting sequence; operators do not need to rework inside corners or open up undersized cuts with hand tools. Power settings matter most in hardwood plywood, where excessive heat can widen the kerf or create a brittle edge. By keeping pulse duration short and assist gas steady, the machine protects the cut zone while maintaining the dimensional stability required for precision die production. The result is a die board that goes straight from cutting table to rule bending and insertion without an extra cleanup pass.
Contact Us
Contact Person: KAELYN LEE
Email: [email protected]
Tel/WhatsApp: +86 15012673758
Website: https://www.china-adewo.com